Sunday, July 14, 2019

The Body Glued Up


The body is glued up now.

I'm something up the ribs and the edges of the belly and the back.  I glued on the neck extension, and trimmed it down flat on the top, and even to the rest of the neck on the sides.   It's starting to look finished.

I have an idea for edge work on it.  Something a bit older than you would find on a normal arch top. I figure that old man Guadagnini might want to show a bit of his flair.  Since he put f holes no it, and not the round sound hole that could be embellished with a rose in the hole, or fancy inlays around the hole,  he would have to put his make elsewhere.


Why not the outline.

It was already being done.  I have the plans for a guitar that is VERY ornate, and has a geometric pattern around the edge.  I'm thinking outside of that, but in that line of thinking.  I'll have to try it out full scale in the proper woods before I start slicing up the guitar to do it.  I have marked it out, and it looks good proportionally.

It seems I went overboard on the neck extension, and the neck dovetail.  It FOR SURE isn't coming loose!  I've been looking, leaning, and posting on the Official Luthiers Forum for a while, and they have a very active post on how not to do stupid things that would make repairs hard.  My neck is one they could write about.

The dovetail is tapered both smaller and deeper.  It is glued the entire length; even on the back face, the face of the upper block, and the button on the back.  THEN the extension is fit into a  cut into the neck end at a 45 degree angle or so,  and glued to both the neck, and the upper block.

Yeah, that thing is solid.

I could have left the back of the dovetail deep,  like they recommended,  but I was thinking that the fit was so good, and the joint so long, and solid, gluing at the button, and a couple of wood screw to keep it from wanting to move would be sufficient.  The joint at the top with the extension would prevent it form coming loose.

It would be the same, but with less glue on the dovetail.  Oh well.


For the binding I'm just going to use .5 mm thick, black dyed wood veneer that I have laying around.  I'd better check to be sure that I have enough.  I can mark the depth I'm going down with a scribe, and file it .5 mm deep.  My plan calls for a black purfling line defining the inlay area around the edge too, so I'll do that at the same time.  Then the inlay.

I have the fretboard roughed out.  It is still rectangular, but has a conical (12 inch, to 17.5 inch) radius cut on it.  I'll cut the slots for the frets in it, rough the angle on the side, and glue it in place.

The photo doesn't show it that well, but the lower treble wing has decided to raise up.  It has a mind of its own.


With the truss rod, and the 6 Grover Ukulele tuners (they only weigh 80 grams) it weighs 1420 grams.  With the fretboard and frets, it might be around 1600 grams.   My classical hanging on the wall is a little over 1800 grams, so it is fairly light.

But first we have to get a mock up of the inlay around the edge done so we can be sure that it works.  It looks cool in my head.

I wonder if nylon strings will drive it, or if it will need a 30% jump in tension to light steel strings. We have a ways to go to find that out.  I can push it down at the bridge, but it takes some effort.


Sunday, May 19, 2019

The Neck

Things have been going slow.  It is spring, and we have stuff to do outside, when it isn't rainy and cold.  I cut the notch for the truss rod with the little plane.  I roughed it out by drilling 3/16 holes along the entire length.  It worked, but would be MUCH better as a scraper plane, set at 90 degrees.  I'll do that for the next one.


The next one?   Why not?

The head is glued on now, and I'm working on the dovetail on the heel.  I'm doing it more violin style than guitar style.   It should be very strong.   The Padauk cuts like Mahogany to me.  It is very easy to work.  I haven't noticed much smell, or irritation. Port Orford Cedar, and Cocobolo are more of a problem with that.  It is not nearly as hard as the Birdseye.


The head is small, I think.  I made it just big enough for 6 Grover Ukulele tuners; without crowding them.  Trying for light.  Speaking of light.  I took the pictures at the same time.  Why. is the light and color so different?  Weird.  I like the golden tan color though.  We'll try for that when varnishing.

I will make up a board with 5/8 dowels on it to hold the ribs in place for gluing.  Another reason for an outside mold.  2' X  2' plywood that I'll have to trim in the width so my clamps can reach.  That will be another post.


Sunday, April 14, 2019

Another Plane


I've been working on thinning the back.  It's way too thick.  I want to do the neck too, and decided to put a truss rod int.  I'm still not sure that it will need it if I go with nylon strings, but everyone seems to use them.  Most of the things I see look overbuilt, but I guess people would rather be safe than sorry.

The truss rod needs a groove.  A deep groove.  Most use a router, or a dado blade on a table saw.  I have neither, and don't really want them. So I needed to make a plough plane.

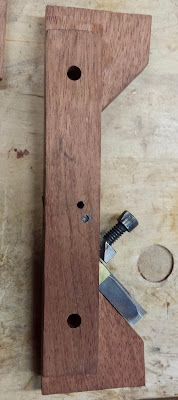
The plane is nothing special to look at.  I made it from a piece of Brazilian Cherry, Jatoba.  A 1/4 X 3 X 24" piece was only $8 at Woodcraft.  That works for me.  I had a 3/8 high speed tool bit that I milled, and ground down to .216 wide.   I made a clamp, and revised it when it didn't work.  It is set to work on the 3/4 inch wide piece of Padauk that is going to be the center lamination of the neck.  It should work.

It would probably be better to show it after it is proven out, but I'm sure I can get it to work, but I want to make a mock up of the neck/head joint to be sure I have it right first.  Then I'll know exactly were the ent of the truss rod will be.

You can see that I changed the pin hole.  It was too low, and too far above the clamp.  You can also see the shims on the sides of the blade.  I left the stock full width, 1/2 inch, so that it would be as wide as the Padauk board, and would center the blade.


I had to make the top of the clamp wider so I could use a 1/4 bolt.


When you add the sides it turns it into a plough plane.  The bottom view shows the wide open throat.

It was easy to make.  We'll see if it works.


Sunday, April 7, 2019

The Sides Are Off The Form


I pulled the sides off of the mold yesterday.  It worked pretty good.  The side actually came out a better shape than the drawing.  The drawing was too straight coming from the top to the center.  Now it has more of a curve.  I will have to add a little; maybe 2 or 3 mm at the most there.  For some reason maybe a mm or 2 near the bottom on one side too.


The sides need the linings cut back, and the lower block can be rounded out.


I marked the inflection line on the inside of the back, and how much needs to come off the point where most of the recurve on the inside.  It is mostly 2-3 mm to get it down to 4 mm thick.  That is a good starting point.  The inside recurve should be good then, and I can glue the back to the ribs.  Then I can see how the belly fits.


Sunday, March 31, 2019

The Physics, Sort Of


Physics.  Many people don't like physics.  I know enough  about what I want to know, and that's about it.  I want to know about stringed instruments, so I looked into it.

I understand the violin type instruments.  The string goes from end to end.  The bridge transfers some of the string tension to the body through the bridge.  The rest puts pressure on the body and the neck.

Violins have a lower bridge and so more of the tension wants to squeeze the instrument shorter, and less goes to the belly through the bridge.

Let's say violin strings have 50 lbs of pressure.  Using a cool calculator here:
https://www.liutaiomottola.com/formulae/downforce.htm
I find that 19 lbs. goes to the bridge, and 31 goes on the neck, and squeezing the body.  Let's do that for violas and cellos, and see what we have.

50.  - 19 - 31  violin
53   - 21 - 31  viola
126 - 59 - 67  cello

The cello has a little over double the tension on the neck, and squeezing the body shorter.  But it has almost 3 times the force on the bridge.

What's this have to do with guitars?  Well, flattops, or classical guitars don't have much of a bridge angle.  They just sort of start in the lower bout and go to the nut.  The bridge placement has been all over.  Quite low on some baroque instruments, and higher up today.   ALL of the tension seems to be on the bridge.  But less than 10% is going down.  The rest is pulling the neck and squeezing the body shorter; and trying to rip the bridge off the belly.  There is serious fighting going on there.

Archtops are more like cellos.

Lets say we have some steel guitar strings, and they are 104 lbs.

104 -   9 - 95  Flattop
104 - 28 - 76  Archtop

What difference does it make?   The common steel string guitar has to be built to survive this constricting tension on the body and neck.  That is the main stress that it has on it.   The arch top on the other hand has about 50% more pressure than a violin on its bridge, or a bit less than 50% less pressure than a cello;  and a bit more pressure on its neck than a cello exerts.

The Archtop doesn't seem to have much in common with the flattop, except for the 6 strings.

In designing this guitar I thought of G. B. Guadagnini seeing one of his grandsons guitars, and coming up with his own ideas.  Looking into the dates, it would be more like his son Carlo, who would have been in his mid thirties when G. B. was getting near the end.

Giovanni would have patterned it as a small cello, with the same scale.  We see from the figures that the 6 strings would put more pressure on the neck, and will attempt to squeeze the belly shorter, than what is on a cello.  But the guitar is also quite a bit shorter.  Shorter beams are inherently stronger.  Even so, double bass bars will be good insurance, and at the same time transmit energy from the bridge.

The neck is 3 ply laminate, so it to should be stronger than a normal cello neck.  I've been debating how I want to string it.  I've always played a classical, so lighter strings would be fine.

Back in Giovanni's day, a set of strings for guitar would be gut strings.  The bottom three would be wound in metal.   The total tension with a 635 scale, would be maybe 82 lbs.  If we use that number we have:

82 - 22 - 60

These numbers would be about the same using nylon strings.

Now we see that the early guitar was not built like a battleship , as many guitars seem to be today.  Those strings couldn't get a thick stiff top working.  I think that amplification has been a big culprit.  If you can amp it up, and everyone can hear; it makes it easy.  Comparing the gut/nylon numbers to the cello numbers we see that the force on the bridge is about the same as the force on a violin or viola bridge.

That's something to think about.

If we make the body pretty much to violin stiffness, it would work.  I'm thinking of not putting in a truss rod too.  I don't have a router, and don't really want one.  The stress is less than on a cello.  The double tone bars should keep the belly from getting shorter.  The neck, made with sides of Birdseye maple, and a core of 3/4" Padauk, should be plenty stiff.  I'll put a baroque  head joint on, and not a scarf joint.  The Birdseye isn't long enough to cut the head out with the sides.  Not if I want to make a viola out of the rest of it.   I do.   A baroque head joint should look cool with the two tone neck.  The head will be Birdseye,  veneered on top, and banded.

Giovanni isn't going to skimp on the decoration.  Guitars in the early days had decoration; and mustaches.  Thankfully this one will be clean shaven, but it will have inlays around the edge; because there is no rosette, because there is no round sound hole.

The redwood has very good longitudinal stiffness but transverse strength is quite low.  It should be easy to get it to move; but also easy to go too far.  Think about the belly flexing mostly up and down in the middle,  and all that movement.


Saturday, March 23, 2019

A Collapsable Mold


When building a violin or viola, we make a simple wooden inside mold that the blocks are glued on to, and the ribs are bent around.  The linings can even be glued on, and then the blocks are broken loose, and the completed ribcage can be wrestled off the form like taking  a bicycle tire off the rim.

Archtop sides are only half the height of cello sides, but they are twice what violin or viola sides are.  I found that a 2 X 10 works perfectly.  It gives enough space to glue the linings on each side, so that when the ribcage is taken out it doesn't go completely out of whack.

But there is a problem on this one.  It has a cutaway.  I've found while roughing the plates that a cutaway will give a different sound than a full form guitar.  The size of the big mass is cut down.  You might think of it as a fancier speaker with a woofer, a midrange and a tweeter; instead of just a single multipurpose cone speaker.  It seems like you could get brilliancy, and good bass response, with thinner, more responsive plates.  At least that's what I hoping.

But it creates a problem.  Not for most makers.  Most guitar makers use an outside mold.  It just seems like a lot of work, a lot of wood, and that it would take up a lot of space. Besides, I'm used to an inside mold. But the dilemma is: how do you pry it off with that cutaway?

A collapsable mold.

Many violin makers make them.  I have one in the works for a Guadagnini violin.  For this guitar I made one up by taking 1 1/2" out of the center, and replacing it with a removable centerpiece.  The two sides are connected to it with 4 dowels, and 2 carriage bolts.  The blocks are glued to the ends, and I solved the problem of finding shims to add under the mold when gluing the blocks on by bolting two strips of wood of the correct height on the bottom side.  When I glue the ribs on, I can put 1 mm shims under them, and there will be stock on each side to plane off.

It should work.  Maybe not with the back glued on, but we'll see.


You can see the curly grain in this piece of wood I bought at Menards.  Fir I'm guessing.  It looked nice.  Isn't curly wood the best?


This is the completed mold.  Its final design was by mistake, but is looks like it was planned.  The dowels are slip fit; maybe a thou clearance, but one fell out, and is MIA.


The difference between a guitar mold an a viola mold.  The viola mold isn't completed yet.  It was cut down from another mold that I'm not using.


I found that my big Craftsman jointer works great on these ribs.

Sunday, March 10, 2019

The Belly Arching


The belly arching is different from the back.  It is started with the same diagonal catenary arches on the inside.  But on the belly both arches are continuous end to end.  Also, where the cross arches on the back left a central thick area, at least through most of the instrument, the belly cross arches go from end to end as well.  The inside long arch comes out to be a catenary as well.

So the belly is basically just straight arches.  This seems like it would be just as grandpa Guadagnini would have done it.

I found a photo of a Guadagnini cello f hole.  Reducing it 92% makes it the size drawn up on the plan.  That will make it more like a Guadagnini, I hope.  I drew them out on the top, and fluted them in some.

Right now the thickness is mostly 6 mm,  with some areas at 5 mm.  I'm thinking it might finish up somewhere around 4 mm to 6 mm.   The point where it switches from convex to concave is closer to the edge than the back, with its cycloid edges.  The arch height, width, and more even thicknesses make it the shape that it is.

Is it just me, or does the 92% one look fatter too?  Maybe it is because I had it done in black and white, and not color?  The photo is mostly grey, and the scan doesn't work as well on great in black and white.


The Body Glued Up

The body is glued up now. I'm something up the ribs and the edges of the belly and the back.  I glued on the neck extension, and tri...